Problem intro
Unless you are working with cutting edge work:
- Most data science problems are structured (i.e in tables). This is where
SQL becomes unavoidable.
- Pager duty triggers, you realized that your SQL jobs start failing, what happened!? Only to find out that the schema / values have changed!
- Work is largely undocumented! What does this
_id column mean? 
If you come from a math/stats background (like me):
- Perhaps only familiar with DataFrames, objects and doing things on an "interactive" console such as python/R? Yup! That was me.
- Ever heard of
select * data scientist that loads everything into dataframe in their local machine or a spark cluster? Yup! That was also me.
- Starts losing hair due to writing/debugging humongous SQL scripts with tons of nested queries? Yup! You got it! That's me!

This guide is mainly for BigQuery (GCP) users! But the concepts are still useful if you are using other databases here
Motivations
If you need further motivations, I strongly encourage you to read DBT's blogpost in the references section below and the medium posts!
The post on what is an analytics engineer is STRONGLY recommended!!
Pre-Req
- Understanding of sql & cli (command line interface)
- Understanding of python - anaconda
- Or use any other python distribution you are familiar with
- Users of BigQuery
Setup
Chop Chop! (Hurry up!)
Code has been prepared for you, just copy and run in your terminal!
You still need check and/or create the appropriate directory though.
Or, if you are in a rush, just clone this repo!. (You will still need to follow the GCP instructions and select either local development or remote development with docker in vscode).
Look at GCP & config files, and then either select
local development or- a cookier cutter environment with docker out of vscode.
Make sure you have gcloud installed and run:
gcloud auth application-default login \
--scopes=https://www.googleapis.com/auth/userinfo.profile,\
https://www.googleapis.com/auth/cloud-platform,\
https://www.googleapis.com/auth/drive.readonly
Decide on your:
- gcp_project_id
- gcp_dataset
- a good folder name
- a good profile name
To use defaults:
export GCP_PROJECT_ID=$(gcloud config list project --format 'value(core.project)')
export GCP_DATASET=dbt_intro
export DBT_FOLDER=dbt_hw
export DBT_PROFILE=my_dbt_profile
First, set up a profile.yml file in $HOME/.dbt/ :
Chop Chop!
cat <<EOF > $HOME/.dbt/profiles.yml
$DBT_PROFILE:
  target: dev
  outputs:
    dev:
      type: bigquery
      method: oauth
      project: $GCP_PROJECT_ID
      dataset: $GCP_DATASET
      threads: 4 # you can change this value
      timeout_seconds: 300
      location: US # Optional, one of US or EU
      priority: interactive
      retries: 1
EOF
Assuming you are using anaconda,
Create conda environment
conda create -n dbt python=3.8
conda activate dbt
pip install dbt==0.18.1
Navigate to your working directory desired,
dbt init $DBT_FOLDER --adapter bigquery
Navigate to your DBT_FOLDER directory, open up dbt_project.yml:
edit profile: 'default' to profile: 'my_dbt_profile'
and proceed to next section!
cookiecutter https://github.com/Freedom89/vs-docker-py-dbt gcp_project_id=$GCP_PROJECT_ID gcp_dataset=$GCP_DATASET dbt_folder=$DBT_FOLDER dbt_profile=$DBT_PROFILE directory_name=vs_dbt dbt_project=my_new_project
and navigate to the dbt folder within the cookiecutter and launch in vscode:
cd vs_dbt/
code .
Install the recommended extensions, and open user settings. Select Rebuild and Reopen in Container!
Wait for the vscode to finish building.
In your vscode terminal, navigate to $DBT_FOLDER which should be dbt_hw.
BQ Auth
Incase you are unable to use oauth and require a service account, you would need to configure your profiles.yml differently.
Docs on bigquery profile.
This will also be useful when you are trying to productionize.
Introduction
Dbt Run
Navigate to your DBT_FOLDER which should be dbt_hw, you should see the following files:
.
├── README.md
├── analysis
├── data
├── dbt_project.yml
├── macros
├── models
│   └── example
│       ├── my_first_dbt_model.sql
│       ├── my_second_dbt_model.sql
│       └── schema.yml
├── snapshots
└── tests
In your terminal run:
dbt run
output:
Running with dbt=0.18.1
Found 2 models, 4 tests, 0 snapshots, 0 analyses, 155 macros, 0 operations, 0 seed files, 0 sources
01:52:06 | Concurrency: 4 threads (target='dev')
01:52:06 |
01:52:06 | 1 of 2 START table model dbt_intro.my_first_dbt_model................ [RUN]
01:52:09 | 1 of 2 OK created table model dbt_intro.my_first_dbt_model........... [�[32mCREATE TABLE (2.0 rows, 0.0 Bytes processed)�[0m in 3.45s]
01:52:09 | 2 of 2 START view model dbt_intro.my_second_dbt_model................ [RUN]
01:52:12 | 2 of 2 OK created view model dbt_intro.my_second_dbt_model........... [�[32mCREATE VIEW�[0m in 2.28s]
01:52:12 |
01:52:12 | Finished running 1 table model, 1 view model in 8.24s.
�[32mCompleted successfully�[0m
Done. PASS=2 WARN=0 ERROR=0 SKIP=0 TOTAL=2
To verify that your datasets is in bigquery,
bq ls | grep $GCP_DATASET
output:
dbt_intro
Explanation
In dbt_project.yml:
models:
  my_new_project:
      # Applies to all files under models/example/
      example:
          materialized: view
This means that all queries in the example folder will be written as a view unless otherwise specified. For example:
In models folder:
models/
└── example
    ├── my_first_dbt_model.sql
    ├── my_second_dbt_model.sql
    └── schema.yml
In the my_first_dbt_model.sql there is {{ config(materialized='table') }} at the top of the sql script.
Rendered Query
After Running...
You should have a few new folders/files,
L=1 [error opening dir]
.
├── README.md
├── analysis
├── data
├── dbt_modules
├── dbt_project.yml
├── logs
│   └── dbt.log
├── macros
├── models
│   └── example
│       ├── my_first_dbt_model.sql
│       ├── my_second_dbt_model.sql
│       └── schema.yml
├── snapshots
├── target
│   ├── compiled
│   │   └── my_new_project
│   │       └── models
│   │           └── example
│   │               ├── my_first_dbt_model.sql
│   │               └── my_second_dbt_model.sql
│   ├── graph.gpickle
│   ├── manifest.json
│   ├── partial_parse.pickle
│   ├── run
│   │   └── my_new_project
│   │       └── models
│   │           └── example
│   │               ├── my_first_dbt_model.sql
│   │               └── my_second_dbt_model.sql
│   └── run_results.json
└── tests
All queries run will be compiled into the target/run folder. There is also a compile method that will be covered in analysis.
cat target/compiled/my_new_project/models/example/my_first_dbt_model.sql
output:
with source_data as (

    select 1 as id
    union all
    select null as id

)

select *
from source_data
Source
Now, suppose you need to do some analysis, let's say on wikipedia data, you would typically hard reference. e.g
SELECT * FROM `bigquery-public-data.wikipedia.pageviews_2020`
In DBT, you can define a sources.yml in the models folder as follows:
version: 2

sources:
  - name: bqpublic
    database: bigquery-public-data
    schema: wikipedia
    tables:
      - name: pageviews_2020
      - name: pageviews_2019
Chop Chop!
cat <<EOF > models/sources.yml
version: 2

sources:
  - name: bqpublic
    database: bigquery-public-data
    schema: wikipedia
    tables:
      - name: pageviews_2020
      - name: pageviews_2019
EOF
Now instead of
SELECT * FROM `bigquery-public-data.wikipedia.pageviews_2020` WHERE DATE(datehour) = "2020-01-01"
you can:
SELECT * FROM {{source('bqpublic','pageviews_2020')} WHERE DATE(datehour) = "2020-01-01"
Dataset naming
Before we go ahead and create another sql, It is often a good idea to split your queries by category. In the example, it is being written to dbt_intro dataset, what if you want to write the table to dbt_intro_wiki?
If you noticed, schema in DBT is actually referring to the dataset. We can add the settings to the dbt_project.yml as follows:
models:
  "my_new_project":
    # Applies to all files under models/example/
    example:
      materialized: view
    wikipedia: # add this
      materialized: table # add this
      +schema: wiki # add this
Chop Chop!
export folder=wikipedia
mkdir models/$folder
cat <<EOF >> dbt_project.yml
    $folder:
      materialized: table
      +schema: wiki
EOF
Define another sql
Now lets define a script wiki_hardref.sql within the wikipedia folder:
SELECT
    DATE(datehour) AS DATE,
    COUNT(*) AS COUNT
FROM
    {{ source(
        'bqpublic',
        'pageviews_2020'
    ) }}
WHERE
    DATE(datehour) = "2020-01-01"
GROUP BY
    1
Chop Chop!
cat <<EOF > models/wikipedia/wiki_hardref.sql
SELECT
    DATE(datehour) AS DATE,
    COUNT(*) AS COUNT
FROM
    {{ source(
        'bqpublic',
        'pageviews_2020'
    ) }}
WHERE
    DATE(datehour) = "2020-01-01"
GROUP BY
    1
EOF
and run:
dbt run --models wikipedia
to verify:
bq ls | grep $GCP_DATASET
output:
dbt_intro
dbt_intro_wiki
To query the newly created tables:
bq query --nouse_legacy_sql \
"SELECT
  *
FROM
  $GCP_PROJECT_ID.dbt_intro_wiki.wiki_hardref"
Output:
+------------+-----------+
|    date    |   count   |
+------------+-----------+
| 2020-01-01 | 139700226 |
+------------+-----------+
Variables
In the earlier example,
... WHERE DATE(datehour) = "2020-01-01"
the date "2020-01-01" was "hard-coded"
Other than addressing this issue, let's further complicate the problem:
What is the top 20 titles per day?
This is how you might design your sql:
WITH raw_count AS (
    SELECT
        DATE(datehour) AS DATE,
        title,
        COUNT(*) AS n_views
    FROM
        {{ source(
            'bqpublic',
            'pageviews_2020'
        ) }}
    WHERE
        DATE(datehour) BETWEEN "{{ var('start_date') }}"
        AND "{{ var('end_date') }}"
    GROUP BY
        1,
        2
),
count_rank AS(
    SELECT
        *,
        ROW_NUMBER() over(
            PARTITION BY DATE,
            ORDER BY
                n_views DESC
        ) AS rn
    FROM
        raw_count
)
SELECT
    *
FROM
    count_rank
WHERE
    rn <= 20
Chop Chop!
cat <<EOF > models/wikipedia/wiki_vars.sql
WITH raw_count AS (
    SELECT
        DATE(datehour) AS DATE,
        title,
        COUNT(*) AS n_views
    FROM
        {{ source(
            'bqpublic',
            'pageviews_2020'
        ) }}
    WHERE
        DATE(datehour) BETWEEN "{{ var('start_date') }}"
        AND "{{ var('end_date') }}"
    GROUP BY
        1,
        2
),
count_rank AS(
    SELECT
        *,
        ROW_NUMBER() over(
            PARTITION BY DATE
            ORDER BY
                n_views DESC
        ) AS rn
    FROM
        raw_count
)
SELECT
    *
FROM
    count_rank
WHERE
    rn <= 20

EOF
and running it with vars:
dbt run --models wikipedia.wiki_vars --vars '{"start_date": "2020-01-01", "end_date": "2020-01-02"}'
Similarly, the vars can be specified in the dbt_project.yml! In this scenario:
...
clean-targets: # directories to be removed by `dbt clean`
  - "target"
  - "dbt_modules"

vars:
  CONSTANT_ONE: 1
  start_date: "2020-01-01"
  end_date: "2020-01-02"

models:
...
More information can be found in the docs!
Do take note on the precedence of the variables.
Ref function
A reasonable follow up question is - are the top 20 titles consistent? Here is how you might run the query in dbt:
Create a new file distinct_titles.sql in the wikipedia folder:
SELECT
    COUNT(DISTINCT(title)) AS count_titles
FROM
    {{ ref('wiki_vars') }}
Chop Chop!
cat <<EOF > models/wikipedia/distinct_titles.sql
SELECT
    COUNT(DISTINCT(title)) AS count_titles
FROM
    {{ ref('wiki_vars') }}
EOF
You could run this model alone by dbt run --models wikipedia.wiki_vars, but suppose you are running this in the form of a ordered execution (think dataframes being passed to one another or running an entire python script), we trigger the full graph with dbt run.
Output:
Running with dbt=0.18.0
Found 5 models, 4 tests, 0 snapshots, 0 analyses, 155 macros, 0 operations, 0 seed files, 2 sources

17:06:16 | Concurrency: 4 threads (target='dev')
17:06:16 |
17:06:16 | 1 of 5 START table model dbt_intro.my_first_dbt_model................ [RUN]
17:06:16 | 2 of 5 START table model dbt_intro_wiki.wiki_vars.................... [RUN]
17:06:16 | 3 of 5 START table model dbt_intro_wiki.wiki_hardref................. [RUN]
17:06:21 | 1 of 5 OK created table model dbt_intro.my_first_dbt_model........... [CREATE TABLE (2.0 rows, 0.0 Bytes processed) in 5.23s]
17:06:21 | 4 of 5 START view model dbt_intro.my_second_dbt_model................ [RUN]
17:06:24 | 3 of 5 OK created table model dbt_intro_wiki.wiki_hardref............ [CREATE TABLE (1.0 rows, 1.0 GB processed) in 8.01s]
17:06:24 | 4 of 5 OK created view model dbt_intro.my_second_dbt_model........... [CREATE VIEW in 2.95s]
17:07:16 | 2 of 5 OK created table model dbt_intro_wiki.wiki_vars............... [CREATE TABLE (40.0 rows, 8.5 GB processed) in 59.49s]
17:07:16 | 5 of 5 START table model dbt_intro_wiki.distinct_titles.............. [RUN]
17:07:20 | 5 of 5 OK created table model dbt_intro_wiki.distinct_titles......... [CREATE TABLE (1.0 rows, 374.0 Bytes processed) in 4.85s]
17:07:21 |
17:07:21 | Finished running 4 table models, 1 view model in 67.72s.

Completed successfully

Done. PASS=5 WARN=0 ERROR=0 SKIP=0 TOTAL=5
If you noticed, DBT automatically looks at source and ref to determine the execution graph and maximizes the number of threads specified in in your profiles.yml runs the query in the appropriate order.
Running Specific Models
If you notice, in the earlier examples,
| description |
command |
| run full dbt |
dbt run |
| run specific folder |
dbt run --models wikipedia |
| run specific model |
dbt run --models wikipedia.wiki_vars |
The full documentation can be found here.
The two other commonly used features (in my experience) are:
You now have enough information to get started with DBT!
Advance Section!
These are some of the more advance features in DBT.
BQ Specific
In the previous examples, tables were either views or tables. In bigquery (or other databases), partitions are a great way to speed up your query (and reduce costs).
The full list of configurations can be found here. To quickly go through:
Partition
To partition your query, you just need to specify at config at the top of your query:
{{ config(
    materialized = 'table',
    partition_by ={ "field": "created_at",
    "data_type": "timestamp" }
) }}
Cluster
Similarly, for clustering:
{{ config(
    materialized = "table",
    cluster_by = ["id1", "id2"],
) }}
Combine Both
You can also partition and cluster by
{{ config(
    materialized = 'table',
    cluster_by = ["id1","id2","id3"],
    partition_by ={ "field" :"partition_date",
    "data_type" :"date" }
) }}
Materializations
Now, if you are a data analyst (or scientist) you would work with events based data (typically true for a technology company). You would not want to refresh your data everyday but instead write incrementally.
Note, the full list of materializations can be found here, namely tables, views, incremental, ephemeral.
Incremental
There are two incremental strategies, insert_overwrite or merge. In the documentation (link at the bottom of this section):
The merge approach has the benefit of automatically updating any late-arriving facts in the destination incremental table. The drawback of this approach is that BigQuery must scan all source tables referenced in the model SQL, as well as the entirety of the destination table. This can be slow and costly if the incremental model is transforming very large amounts of data.
Also, you would also typically make your new table as partitions, this is how you would configure it:
{{
    config(
        materialized='incremental',
        incremental_strategy = "insert_overwrite",
        partition_by ={ "field" :"partition_date",
        "data_type" :"date" }
    )
}}
To know more, I strongly urge you read the bottom two documentations.
Example Incremental
Using the earlier example, create a wiki_incre.sql in the wikipedia folder:
{{ config(
    materialized = 'incremental',
    incremental_strategy = "insert_overwrite",
    partition_by ={ "field" :"partition_date",
    "data_type" :"date" }
) }}

WITH raw_count AS (

    SELECT
        DATE(datehour) AS partition_date,
        title,
        COUNT(*) AS n_views
    FROM
        {{ source(
            'bqpublic',
            'pageviews_2020'
        ) }}
    WHERE
        DATE(datehour) = "{{ var('date_input') }}"
    GROUP BY
        1,
        2
),
count_rank AS(
    SELECT
        *,
        ROW_NUMBER() over(
            PARTITION BY partition_date
            ORDER BY
                n_views DESC
        ) AS rn
    FROM
        raw_count
)
SELECT
    *
FROM
    count_rank
WHERE
    rn <= 20
Chop Chop!
cat <<EOF > models/wikipedia/wiki_incre.sql
{{ config(
    materialized = 'incremental',
    incremental_strategy = "insert_overwrite",
    partition_by ={ "field" :"partition_date",
    "data_type" :"date" }
) }}

WITH raw_count AS (

    SELECT
        DATE(datehour) AS partition_date,
        title,
        COUNT(*) AS n_views
    FROM
        {{ source(
            'bqpublic',
            'pageviews_2020'
        ) }}
    WHERE
        DATE(datehour) = "{{ var('date_input') }}"
    GROUP BY
        1,
        2
),
count_rank AS(
    SELECT
        *,
        ROW_NUMBER() over(
            PARTITION BY partition_date
            ORDER BY
                n_views DESC
        ) AS rn
    FROM
        raw_count
)
SELECT
    *
FROM
    count_rank
WHERE
    rn <= 20
EOF
Run the query as follows:
for ds in '2020-11-01' '2020-11-02' '2020-11-03' ;
  do
    dbt run --models wikipedia.wiki_incre --vars "{'date_input': '${ds}'}"
  done
To test it:
bq query --nouse_legacy_sql \
"SELECT
  partition_date, count(*) as n_titles
FROM
  $GCP_PROJECT_ID.dbt_intro_wiki.wiki_incre
GROUP BY 1"
Output:
+----------------+----------+
| partition_date | n_titles |
+----------------+----------+
|     2020-11-01 |       20 |
|     2020-11-02 |       20 |
|     2020-11-03 |       20 |
+----------------+----------+
full-refresh
Sometimes you change the data model (such as addition of fields) in your incremental models, and you would need to drop the table in order to re-run it.
Rather than deleting the dataset, you can run:
Note: you will need to supply --vars date_input:"2020-11-01" for wiki_incre.sql to run or add date_input in dbt_project.yml under variables.
dbt run --full-refresh
There are additional run command parameters you can specify, such as -x which is similar to pytest, it stops running at the first failure. Docs can be found here.
Linking back to incremental models, you can read partitions based on the most recent partitions you require to compute depending on how your event is being streamed in to your database.
For example,
    {% if is_incremental() %}
      DATE(_PARTITIONTIME) BETWEEN DATE_SUB(DATE('{{ var("ds") }}'), INTERVAL 3 DAY) and DATE('{{ var("ds") }}')
    {% else %}
      AND DATE(_PARTITIONTIME) BETWEEN DATE('2018-01-01') AND DATE("{{ var('ds') }}")
    {% endif %}
Ephemeral
As specified in the code docs, think of ephermeral as code blocks.
ephemeral models are not directly built into the database. Instead, dbt will interpolate the code from this model into dependent models as a common table expression.
In general I did not found this to be useful, I would split my tables into intermediate tables into different datasets (or called schema in DBT's context).
Analysis And Compile
Sometimes, you might want to get the rendered sql without dbt run and looking for the sql in the target folder. An example of this could be taking the rendered sql code.
The docs is pretty clear and short.
Basically,
- create your sql in the
analysis folder
- run
dbt compile
- look for the sql file in
target/compiled/ directory.
We will look at an example when we visit macros!
Docs
Dbt comes with docs out of the box. It also shows the execution graph.
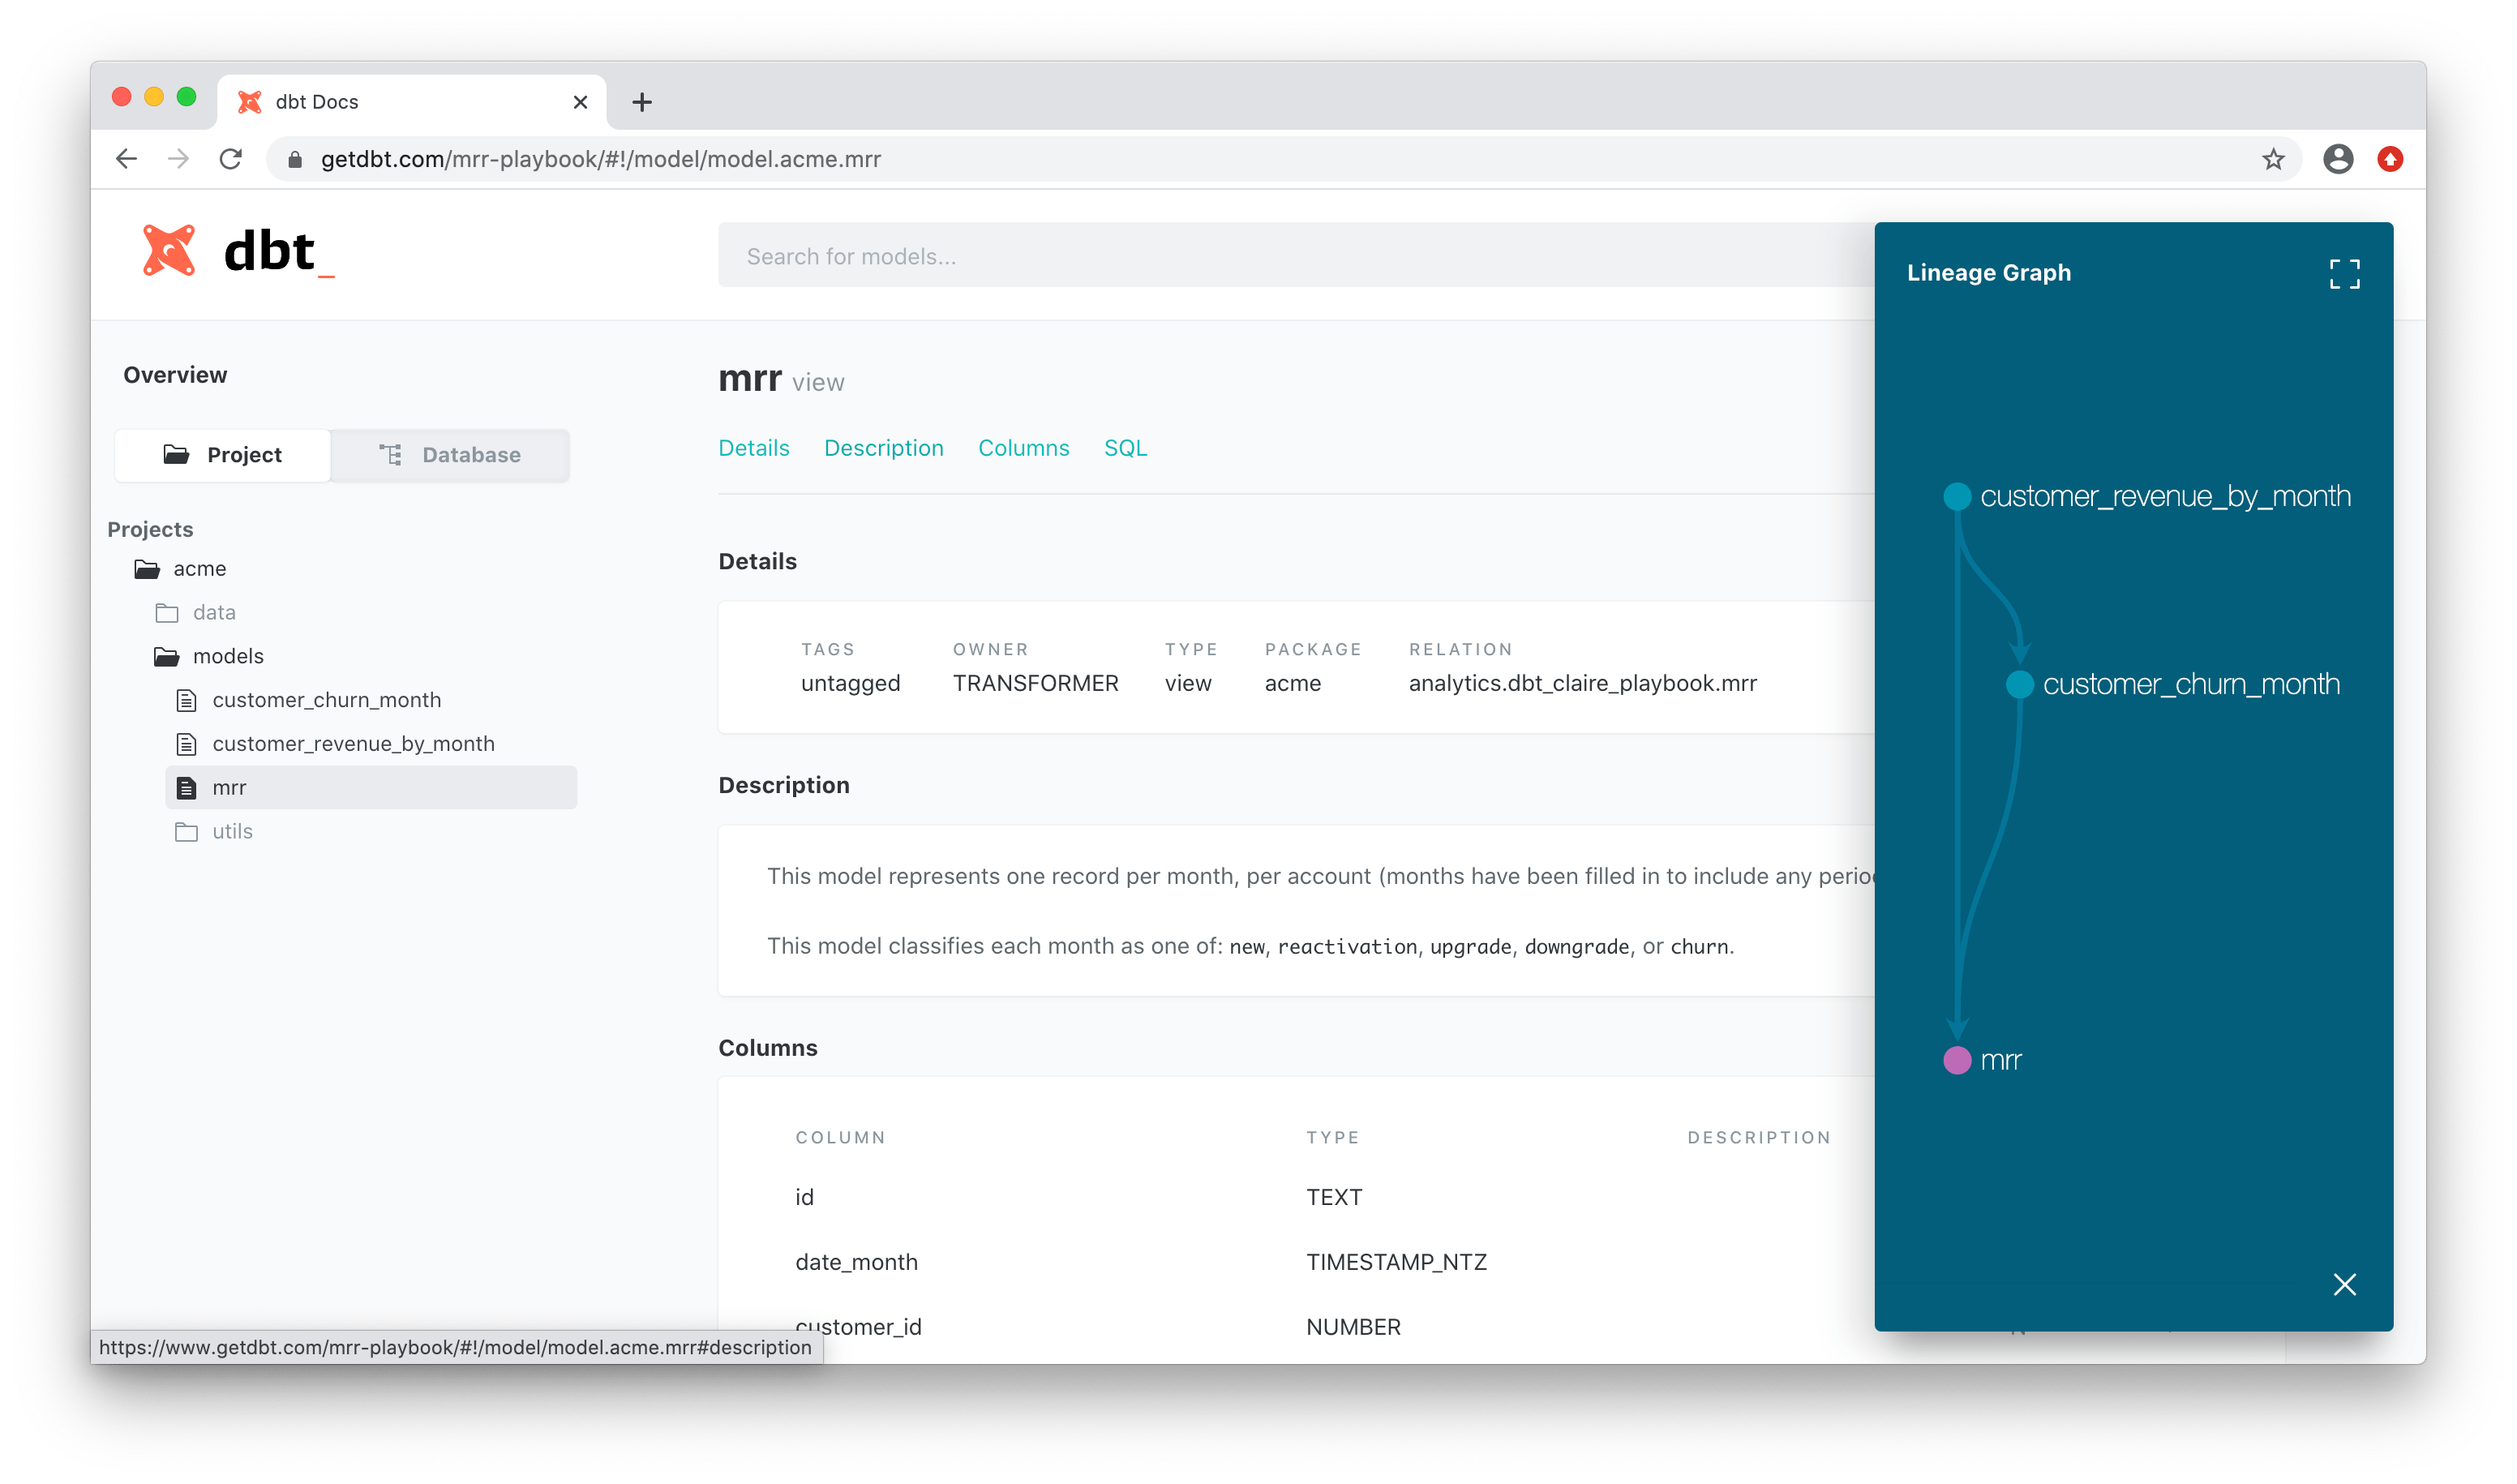
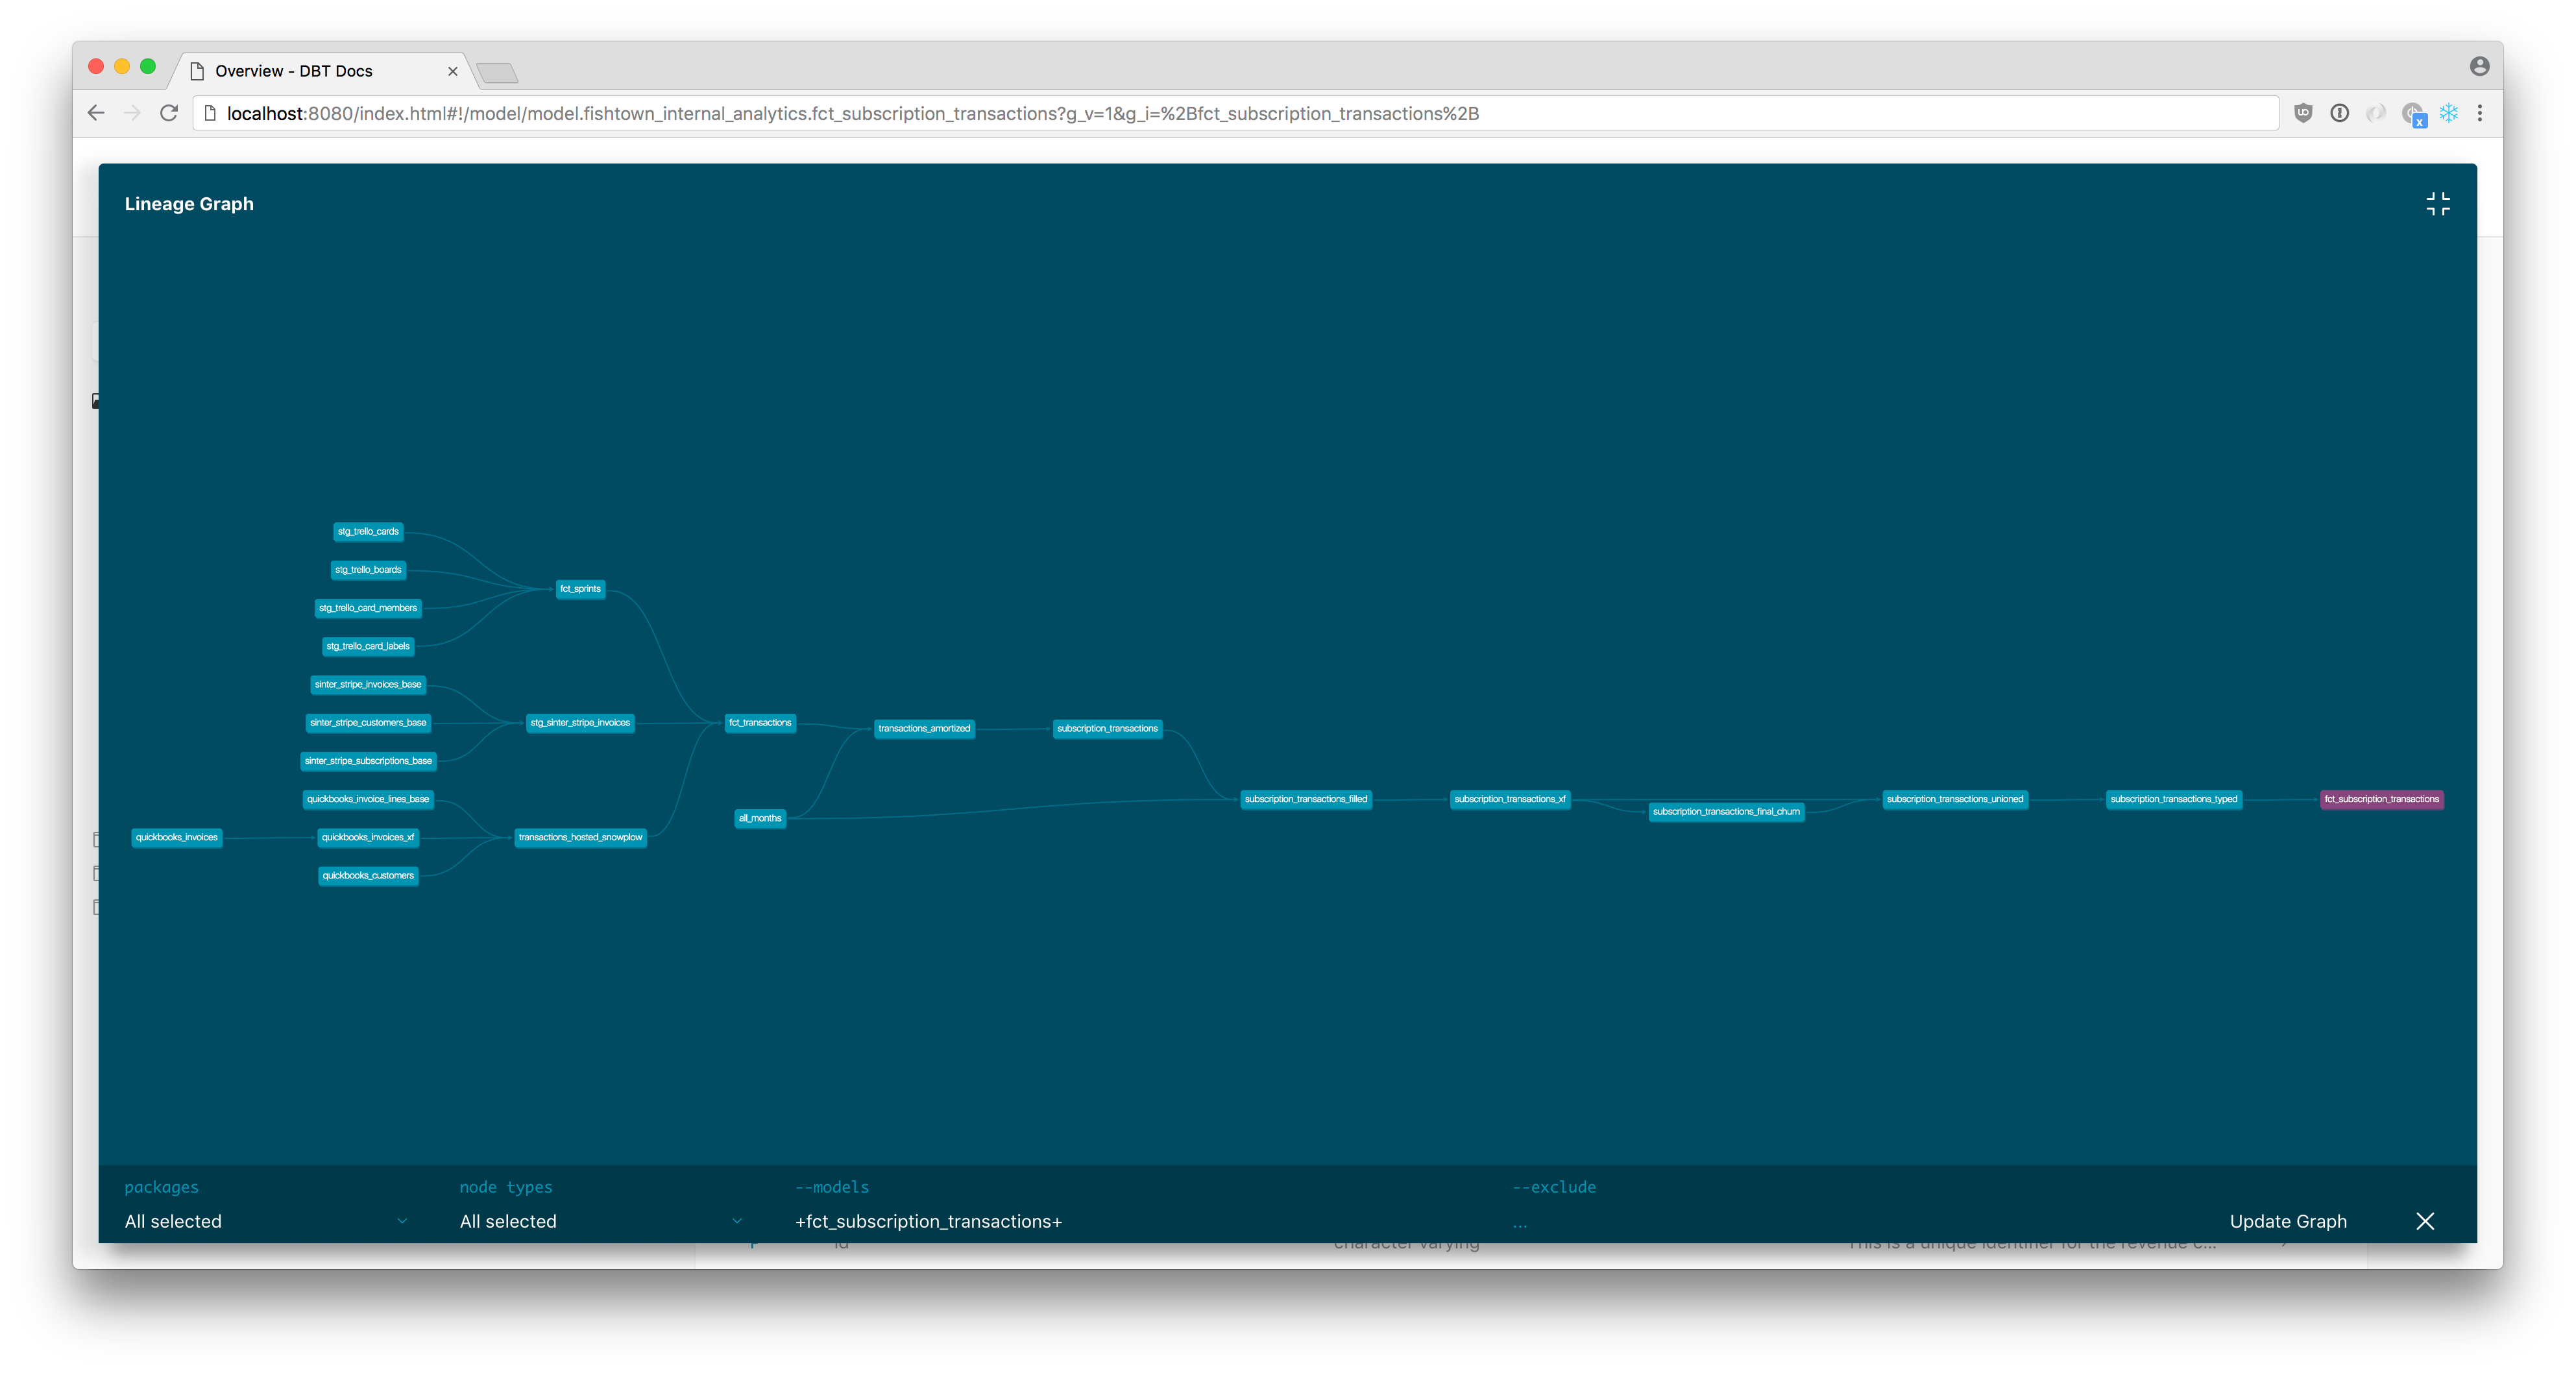
To generate it (locally):
dbt docs generate
dbt docs serve
and visit your localhost:8080!
You can host the assets with any nginx or storage buckets.
Jinja-Macros
The documentation / guide can be found here but here is a quick introduction of the things you can do:
Jinja
In dbt, you can combine SQL with jinja, a templating language. In fact, that is what we have been using with ref, source, config.
with jinja templating, you can use set, for, if as though you are using python functions.
For example, create a sql jinja.sql in analysis folder, and run dbt compile
{# Set a variable #}
{%- set this_is_a_variable = 'some value' -%}
{%- set this_is_a_list = ['hello','there'] -%}
{%- set this_is_a_dict ={ 'key1' :'value1',
'key2' :'value2' } -%}
{%- set dict_of_arrays ={ 'key1': ['value11','value12'],
'key2' :['value21','value22'] } -%}
{{ this_is_a_variable }}
{{ this_is_a_list }}
{# you can loop through the list #}
{%- for item in this_is_a_list -%}
    {{ item }}
{%- endfor -%}

{# notice i did not put the - sign infront, this is for breaklines #}
{% for k,
    v in this_is_a_dict.items() %}
    "This is the key {{ k }}, this is the value {{ v }}"
{%- endfor -%}

{% for k,
    v in dict_of_arrays.items() %}
    "This is the key {{ k }}, first element {{ v[0] }}, second element {{v[1]}}"
{%- endfor -%}

{# you can also convert numbers to types #}
{{ 123.0 | int }}
{# or upper case #}
{{ "abc" | upper }}
{# or lower case #}
{{ "ABC" | lower }}
{# you can also use if else #}
{%- set x = 1 -%}
{# because x is inside the jinja templating, no {{}} is required #}
{%- if x == 1 -%}
    "x is indeed 1"
{%- else -%}
    "x is not one"
{% endif %}

{%- set y = 2 -%}
{# because x is inside the jinja templating, no {{}} is required #}
{% if y == 1 %}
    "y is indeed 1"
{%- else -%}
    "y is not one"
{% endif %}
some value
['hello', 'there']
hellothere

    "This is the key key1, this is the value value1"
    "This is the key key2, this is the value value2"
    "This is the key key1, first element value11, second element value12"
    "This is the key key2, first element value21, second element value22"
123

ABC

abc
"x is indeed 1"
"y is not one"
The full list of jinja functions can be found here.
There are two examples that i wish to highlight:
Run Query
Special mention to Run Query
Run Query is similar to statement block, that basically allows you to assign the output of a query to a table.
To a data scientist / analyst, it is basically running a function (macro), and can later decide whether to assign (jinja) it to a variable.
Exceptions
Exceptions is what you expect it to be, the concept is similar as python try-except,
Here are some examples on checking datatypes, particular useful when designing a macro (function):
Checking datatypes
There are examples on how to use exceptions:
Checking for int:
{%- if must_be_int is not none -%}
    {%- if must_be_int | int > 0 -%}
        {{ exceptions.raise_compiler_error("must_be_int must be an int greater than 0") }}
    {%- endif -%}
{%- endif -%}
Implementing enum:
{%- if not fruit in (
        "apple",
        "orange",
        "watermelon"
    ) -%}
    {{ exceptions.raise_compiler_error("category is wrong) }}
{%- endif -%}
Macros
Macros are like functions (sort of) that you can re-use in multiple queries.
You can combine jinja templating within the macros, and then use the macros in a sql script in your models folder.
This is an example but using analysis and dbt compile.
{% macro my_first_macro(
        table,
        int_input,
        enum_input,
        default_input = none,
        call_system_var = var('end_date')
    ) %}
    {{ call_system_var }}
    {{ int_input | int }}
    {# note, jinja templating int takes in float #}
    {#to check if it is int, should return True#}
    {{ int_input | int > 0 }}
    {{ enum_input | int }}
    {#to check if it is int, should return False#}
    {{ enum_input | int > 0 }}

    {%- if int_input is not none -%}
        {%- if int_input | int == 0 -%}
            {{ exceptions.raise_compiler_error("must_be_int must be an int greater than 0") }}
        {%- endif -%}
    {%- endif -%}

    {# you can assign new variables as well #}
    {% set int_parsed = int_input | int %}
    {{ int_parsed }}

    {%- if not enum_input in (
            "apple",
            "orrange",
        ) -%}
        {{ exceptions.raise_compiler_error("enum_input must be apple or orange") }}
    {%- endif %}

    {% set output_table = 'output_' + table %}
    output_table AS (
        SELECT
            *
        FROM
            {{ table }}
        WHERE
            VALUE = {{ int_parsed }}
            AND category = {{ enum_input }}
            AND partition_date > {{ call_system_var }}

            {%- if default_input is not none -%}
                AND VALUE > default_input
            {%- endif -%}
    )
{% endmacro %}
WITH mytable AS (
    SELECT
        *
    FROM
        {# you can use ref or source here as well #}
        my_data_source
) {{ my_first_macro(
    table = 'mytable',
    int_input = 10.4,
    enum_input = "apple",
    default_input = 10,
) }},
SELECT
    *
FROM
    output_mytable
WITH mytable AS (
    SELECT
        *
    FROM

        my_data_source
)
    2020-01-02
    10


    True
    0

    False
    10


    output_table AS (
        SELECT
            *
        FROM
            mytable
        WHERE
            VALUE = 10
            AND category = apple
            AND partition_date > 2020-01-02AND VALUE > default_input)
,
SELECT
    *
FROM
    output_mytable
Public Packages
A question you might now be asking is how do I share macros with others or across projects?
Intro to Packages docs
Here is a list of packages along with the latest version, similar to CRAN or PYPI.
I have found the fishtown-analytics packages to be useful, in particular:
Installing packages
In the same folder where dbt_project.yml is, create a packages.yml file.
packages:
  - package: fishtown-analytics/dbt_utils
    version: 0.6.2
  - package: fishtown-analytics/codegen
    version: 0.3.1
Chop Chop!
cat <<EOF > packages.yml
packages:
  - package: fishtown-analytics/dbt_utils
    version: 0.6.2
  - package: fishtown-analytics/codegen
    version: 0.3.1
EOF
Run dbt deps to install the packages.
The macros will now appear in dbt_modules:
dbt_modules
├── codegen
│   ├── LICENSE
│   ├── README.md
│   ├── dbt_project.yml
│   ├── integration_tests
│   ├── macros
│   └── packages.yml
└── dbt_utils
    ├── CHANGELOG.md
    ├── LICENSE
    ├── README.md
    ├── RELEASE.md
    ├── dbt_project.yml
    ├── docker-compose.yml
    ├── etc
    ├── integration_tests
    ├── macros
    └── run_test.sh

7 directories, 11 files
Resource properties
Going back to docs, if you explored the UI, you will noticed that the description fields are empty. DBT allows you to specify the resource properties.
Now, typing each one out manually would be too much effort, that is where the dbt-codegen will be useful.
Using Codegen
In analysis create a file codegen.sql:
You can also use the run-operations to invoke a macro without building the models
dbt run-operation generate_model_yaml --args '{"model_name": "wiki_incre"}'
Seeds
Sometimes (or most of the time  ) your product manager ask you to do some adhoc analysis on this excel(csv) file that he (or she) generated (perhaps magically). Also...
In typical production systems, a lot of values are stored as abbreviations, an analyst typically maintain a manual mapping and ad-hoc transfers loads it into the database. This is not properly logged or version control, leading to risks - both on the processes and the resources.
Lucky, DBT has a solution for the above two points:
Introducing seeds!
Essentially, seeds are a way for you to upload csv-files to your database (in this case bigquery).
Generate Seeds
To show an example, we first start by generating the dummy csv files:
cat <<EOF > data/fruits.csv
fruit,size,color
apple,small,red
orange,small,orange
pear,small,green
watermelon,big,green
EOF

cat <<EOF > data/orders.csv
ID,fruit,quantity
1,apple,10
2,pear,20
3,watermelon,100
4,apple,40
5,orange,15
EOF
Run seeds
dbt seed
Output:
Found 6 models, 4 tests, 0 snapshots, 3 analyses, 292 macros, 0 operations, 2 seed files, 2 sources

19:29:38 | Concurrency: 4 threads (target='dev')
19:29:38 |
19:29:38 | 1 of 2 START seed file dbt_intro.fruits.............................. [RUN]
19:29:38 | 2 of 2 START seed file dbt_intro.orders.............................. [RUN]
19:29:43 | 1 of 2 OK loaded seed file dbt_intro.fruits.......................... [INSERT 4 in 4.88s]
19:29:44 | 2 of 2 OK loaded seed file dbt_intro.orders.......................... [INSERT 5 in 5.56s]
19:29:44 |
19:29:44 | Finished running 2 seeds in 8.58s.

Completed successfully
Next, let's make a new project and a new query to query fruits and orders.
Edit project
First we create a new folder and edit the dbt_project.yml to reflect the changes.
export folder=fruits
mkdir models/$folder
cat <<EOF >> dbt_project.yml
    $folder:
      materialized: table
      +schema: fruits
EOF
Create Models
Second, we create the fruits_join.sql while ref the fruits and orders tables that is generated by dbt seed.
cat <<EOF >> models/fruits/fruits_join.sql
SELECT
    *
FROM
    {{ ref('fruits') }}
    LEFT JOIN (
        SELECT
            *
        FROM
            {{ ref('orders') }}
    ) USING (fruit)

EOF
Run Models
And we run the model!
dbt run --models fruits
Generate yml
Lastly, generate the models.yml, this will be useful in the next section:
dbt run-operation generate_model_yaml --args '{"model_name": "fruits_join"}'
fruits_join.yml:
version: 2

models:
  - name: fruits_join
    description: ""
    columns:
      - name: fruit
        description: ""

      - name: size
        description: ""

      - name: color
        description: ""

      - name: id
        description: ""

      - name: quantity
        description: ""
Chop Chop!
cat << EOF > models/fruits/fruits_join.yml
version: 2

models:
  - name: fruits_join
    description: ""
    columns:
      - name: fruit
        description: ""

      - name: size
        description: ""

      - name: color
        description: ""

      - name: id
        description: ""

      - name: quantity
        description: ""
EOF
This is how your files & folders should look like:
data/
├── fruits.csv
└── orders.csv

models
├── example
│   ├── my_first_dbt_model.sql
│   ├── my_second_dbt_model.sql
│   └── schema.yml
├── fruits
│   ├── fruits_join.sql
│   └── fruits_join.yml
├── sources.yml
└── wikipedia
    ├── distinct_titles.sql
    ├── wiki_hardref.sql
    ├── wiki_incre.sql
    ├── wiki_incre.yml
    └── wiki_vars.sql
Just as a reminder, if you are familiar with pytest, you can make use of seeds like fixtures.
Tests
Typically, when a data analyst / scientist is doing EDA or analysis, you would run the following checks:
- Are there any null values in the column?
- Is my primary key column unique?
- A list of Ids you have to map.
- and many more...
Testing documentation here.
Schema Tests
DBT covers 4 schema tests out of the box,
| tests |
description |
| unique |
the column should be unique |
| not_null |
the column should not contain null values |
| accepted_values |
the column should only contain a list of values |
| relationship |
the column values should exists in the columns of the reference table |
Let's assume that the previous two seeds were actually in your database, which we have created as fruits.sql and orders.sql, and a ref query fruits_orders.sql.
In the fruits_join.yml:
version: 2

models:
  - name: fruits_join
    description: ""
    columns:
      - name: fruit
        description: ""
        tests:
          - accepted_values:
              values: ["apple", "pear", "orange", "watermelon"]

      - name: size
        description: ""

      - name: color
        description: ""
        tests:
          - accepted_values:
              values: ["red", "orange", "green"]

      - name: id
        description: ""
        tests:
          - unique
          - not_null
          - relationships:
              to: ref('orders')
              field: id

      - name: quantity
        description: ""
Data Tests
You might also want to check that quantity must always be greater than zero, which is a data test.
To do data tests, the .sql files would be placed in the tests folder. The idea for tests is the output of the query must have ZERO rows. Anything more would result in a failed test.
cat << EOF> tests/assert_fruits_quantity.sql
SELECT
    *
FROM
    {{ ref('fruits_join') }}
WHERE
    quantity < 0
EOF
Note, you can write your own custom schema tests or making use of packages.
Run tests
dbt test --models fruits
Output:
Found 7 models, 10 tests, 0 snapshots, 3 analyses, 292 macros, 0 operations, 2 seed files, 2 sources

20:21:52 | Concurrency: 4 threads (target='dev')
20:21:52 |
20:21:52 | 1 of 6 START test accepted_values_fruits_join_color__red__orange__green [RUN]
20:21:52 | 2 of 6 START test accepted_values_fruits_join_fruit__apple__pear__orange__watermelon [RUN]
20:21:52 | 3 of 6 START test assert_fruits_quantity............................. [RUN]
20:21:52 | 4 of 6 START test not_null_fruits_join_id............................ [RUN]
20:21:55 | 4 of 6 PASS not_null_fruits_join_id.................................. [PASS in 3.04s]
20:21:55 | 5 of 6 START test relationships_fruits_join_id__id__ref_orders_...... [RUN]
20:21:56 | 1 of 6 PASS accepted_values_fruits_join_color__red__orange__green.... [PASS in 4.07s]
20:21:56 | 6 of 6 START test unique_fruits_join_id.............................. [RUN]
20:21:56 | 2 of 6 PASS accepted_values_fruits_join_fruit__apple__pear__orange__watermelon [PASS in 4.11s]
20:21:56 | 3 of 6 PASS assert_fruits_quantity................................... [PASS in 4.38s]
20:21:58 | 5 of 6 PASS relationships_fruits_join_id__id__ref_orders_............ [PASS in 3.54s]
20:22:00 | 6 of 6 PASS unique_fruits_join_id.................................... [PASS in 3.86s]
20:22:00 |
20:22:00 | Finished running 6 tests in 9.83s.

Completed successfully

Done. PASS=6 WARN=0 ERROR=0 SKIP=0 TOTAL=6
For example of a failure, it is actually in the example:
dbt test --models example
output:
20:06:00 | 2 of 6 FAIL 1 not_null_my_first_dbt_model_id......................... [FAIL 1 in 3.99s]
Additional tests
There are other additional tests provided by other libraries, such as dbt_utils, such as
- equal_rowcount
- mutually_exclusive_ranges (lower bound, upper bound)
- not_constant
- cardinality_equality
- ... and many more
This is the full list available from dbt-utils.
Custom tests
Alternatively, you can write your own custom schema tests.
Production
In the earlier example, you are running all the queries in GCP_PROJECT and writing in GCP_DATASET.
A question you might ask is, while prototyping, you do not want the existing pipelines or datasets to break. This is where target will be useful.
Docs to understand more about target and it's associated features here.
To see an example, in profiles.yml:
default:
  outputs:

    dev:
      type: bigquery
      method: oauth
      project: [GCP project id]
      dataset: [the name of your dbt dataset] # You can also use "schema" here
      threads: [1 or more]
      timeout_seconds: 300
      location: US # Optional, one of US or EU
      priority: interactive
      retries: 1

    prod:
      type: bigquery
      method: service-account
      project: [GCP project id]
      dataset: [the name of your dbt dataset]
      threads: [1 or more]
      keyfile: [/path/to/bigquery/keyfile.json]
      timeout_seconds: 300
      priority: interactive
      retries: 1

  target: dev
This means that the default is dev. You choose to use a different GCP project for prod or stg or dev.
To run DBT with a different target,
dbt run --target prod
Docs to understand more about your dbt profile.
Bq-Console Feedback
A common feedback and/or question regarding dbt users with bigquery database:
How do I know my query runs instead of dbt run?. Also, the console display the expected cost of query which can be useful for me to determine whether my SQL is optimized!
This is my current solution, but first you must be willing to do either:
- run
dbt compile or,
- code in a
.sql file as though in the bigquery console.
and run the following:
bq query --use_legacy_sql=false --dry_run --flagfile=#SQLFILE
If you are familiar with Makefile and/or bash scripting, this is one way of defining it as well:
DBT_PATH=dbt_hw/target/compiled/my_new_project/
TYPE=models #analysis #tests
dry_run:
    bq query --use_legacy_sql=false --dry_run --flagfile=$$(find $(DBT_PATH)$(TYPE) -name $(FILE))
and run
make dry_run FILE=fruits_join.sql
output:
Query successfully validated. Assuming the tables are not modified, running this query will process 206 bytes of data.
In the vscode extensions, it is using this formatter which is using another formatter under the hood.
The current sql dialects only support snowflake at the moment, as such you might experience weird behavior when using BQ specific functions such as SAFE_CAST.
To overcome this, just save without formatting. In summary there are two options:
⌘K S.Cmd+⌘+P to open user settings and select File: Save without formatting.
Enabling
Sometimes you would want to "disable" certain parts of your models or sources, perhaps a reason could be you want to exclude certain models to prevent overwriting of an existing package.
Customization
In the earlier examples, the dataset is defined by profiles.yml while additional schema is defined by dbt_project.yml. Suppose if you need additional customizations,
Unfortunately, node is undocumented, my personal current workaround is:
{% macro generate_schema_name(custom_schema_name, node) -%}

    {{log(node,info=True)}}
    {%- set default_schema = target.schema -%}
    {%- if custom_schema_name is none -%}

        {{ default_schema }}

    {%- else -%}

        {{ default_schema }}_{{ custom_schema_name | trim }}

    {%- endif -%}

{%- endmacro %}
and running dbt compile and observe the logs for the variables.
Logging
Sometimes you would want to print out logs if you are using an external production environment or you want to check the variables that is being computed,
{{ log(var, info=True) }}
Summary
In Introduction, we have seen the problems a data analyst or scientist would normally encounter.
- By using DBT, you are able to your SQLs in the form of a graph.
- Thus avoiding humongous SQLs scripts
- Furthermore, by making use of jinja templating and macros, you have an "pythonic" way of doing things!
- Such as if-else, for, setting variables, functions, inheritance, objects, as well as testing!
- Documentation is filled along the way while you are writing tests by generating the model schema.
- A new joiner / maintainer can simply generate & serve the docs to start understanding your work.
Have fun with DBT!
Feedbacks welcome! 
References
DBT discourse
Testing
DBT viewpoints
Other companies
Other authors
These are articles i found useful and motivating to use dbt, and sharing it here! 
Medium posts